Sunday, 24 January 2010
Apologies
Apologies for the lack of posts recently. January means exams for us lazy students, so I've had no time for WH. But I will have some exciting posts soon; New camo patterns, and cool winter bases!

Thursday, 14 January 2010
Valhallan Fluff/ Info
Greetings all! I know I have a couple of Valhallan fan's reading my blog and this is for them (no update on the army, I'm still in the process of removing flash etc. and drilling 100 odd lasgun barrels... Fun!): I recently got hold of White Dwarf 183 from March 1995. It has a good 5 pages on Valhallans including their background story and some tactics! If I can get hold of a scanner I'll pop a couple of pages up on here. Also I found out who the Valhallan designer and sculptor was; the famous Alan Perry. That's all for now, hopefully next time I will have an update on some different camo patterns in response to the feedback I got (Thanks for that BTW, its much appreciated!).

White Dwarf 183
Wednesday, 13 January 2010
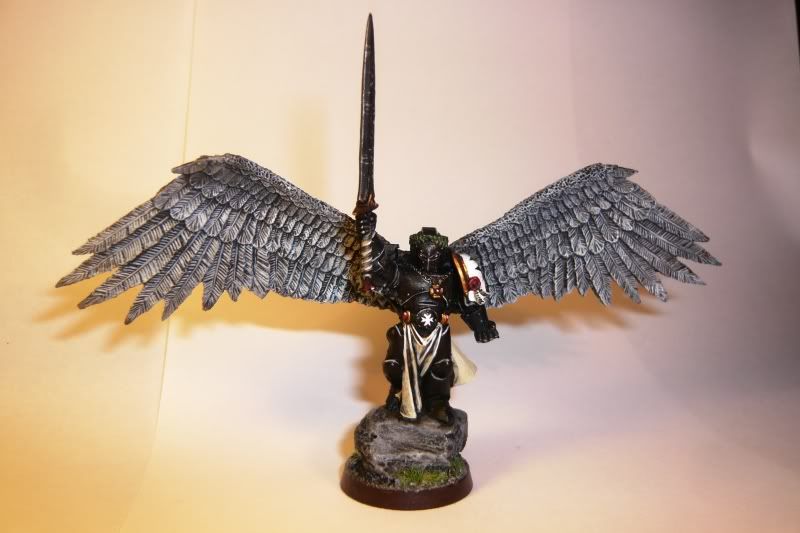
Off Topic: Converted Emperor's Champion
Something off topic: just thought I'd show off my Converted Emperor's Champion that I've been working on for my Templar army. Still a bit of blending work to be done but I'm hoping to enter him into the singles category for the Golden Bolter competition; I don't expect to win anything, but hey why not!



Couple More Basilisk
Not much to update you on. I have however finished the other two of my Basilisks that came in the Battery boxset. The Command Basilisk:

 It has this extra command unit on the side. I haven't seen these anywhere else, but if I'm wrong please correct me.
Also a battle-hardened Basilisk:

It has this extra command unit on the side. I haven't seen these anywhere else, but if I'm wrong please correct me.Also a battle-hardened Basilisk:
Needs a bit of a clean up, and I think I'll add some sandbags on the sides when I get some more green stuff
Friday, 8 January 2010
Painted Valhallans Ahoy!
I finally painted the first of my Valhallans. I decided to go with a white uniform to match their environment (in keeping with the fluff). I've got three painted atm but there will be more to come:

Voxcaster

Valhallan Flamer
 Valhallan Trooper
I was worried that a white colour scheme wouldn't have much contrast, however, I'm pretty damn happy with how these guys turned out. My general painting formula was:
Primer: Skull White
Basecoat: Astronomican Grey
Wash: Badab Black
Layer 1: 1:1 Astronomican Grey/Skull White
Layer 2: 1:2 Astronomican Grey/Skull White
Layer 3: Thinned Skull White
Layer 4: Thinned Skull White
Extreme Highlights: Skull White
I also tried a couple of different techniques for the bases. The flamer has the GW snow baser on it. I personally don't like this... It has a very fluffy (not 'fluffy') look to it, not the right type of snow for me. I also experimented with bicarbonate with PVA for the Troopers base, this is closer to what I want. I might take some advise from Müller's Minatures from Valhall.
Since it has been snowing pretty heavily I couldn't resist taking some photos of these miniatures in the snow. Have a look:

Thursday, 7 January 2010
Valhallan Basilisk
What did I want all those sandbags for? My slightly converted Basilisk of course!

Vahallan Basilisk #1


Wednesday, 6 January 2010
How To Make Sandbags from Green Stuff
A quick and easy tutorial on how to make decent sandbags from green stuff.
You'll need:
You'll need:
- 4-6" of Green Stuff
- Modelling knife/ Stanley Knife
- Pot of water to make sure your fingers/work surface don't get stuck to the green stuff
- Sieve/ Strainer/ Metal Gauze/ Netting
Step 1: Grab your green stuff and mix it together until you can no longer see and yellow or blue streaks.
Step 2:
Roll your green stuff into a long thin cylinder about 8" in length and 1/4 - 1/2" in diameter.
Step 3: Grab your knife and cut the green stuff into 1/2" chunks:

Step 4: Flatten out the chunks and round off the edges. Use the side of your thumb to rub off any fingerprints.


Flatten out the chunks and round off the edges. Use the side of your thumb to rub off any fingerprints.Step 5:
Using the knife score a line into the edges of the bags.
Step 6:
Grab your sieve
Press the gauze gently into the top of all the sand bags. This gives them a nice material texture. The finer the netting of the gauze the more realistic it will look.
The Final Result:
Looks half decent and doesn't cost a lot. Use them on bases, heavy weapon emplacements, defence lines or anywhere else!
Subscribe to:
Posts (Atom)


